An Interesting Use Case for A Laser Engraver
VIDEO
In this project and video, I’m using the Ortur Laser Master 2 Pro from Made The Best to engrave the head of a bourbon barrel as well as the belly of the barrel. If you’ve ever seen a bourbon barrel, you know just how challenging this is because of how curved and inconsistent the barrels are. My friend, Jeremy, does a lot of work in the bourbon industry and he has some clients that get him to put their logo on their previously-used barrels so they can sell them to customers. (We have permission to use these logos you see in these photos and in the video) Follow along and be sure to watch the video to see how it all turned out!
BACKGROUND
For a little more background, my friend does a lot of these barrels for some companies, and he’s always looking for new and better ways to do the process of adding the logos to the barrel’s belly and head. When I mentioned I wanted to try this Ortur Laser Master 2 Pro out, he suggested we try to build a jig that would allow it to be used on the barrels.
One of the advantages of this laser engraver is that it is semi-portable. It is very light and can be moved and taken to your workpiece, as long as the cords would reach. For instance, if you made a large table top, you could set this laser engraver right onto the underside of the table top and engrave your logo or maker’s mark.
TOOLS & MATERIALS: (affiliate links)
Ortur Laser Master 2 Pro: https://bit.ly/3aB3weX
Masking: https://amzn.to/3lNGU17
Painter’s Tape: https://amzn.to/3aQcHrT
BUILDING THE JIGS
We needed two different jigs to accomplish these engraves. One would be a basic circle cut out of a piece of plywood. The circle would be just wider than the top of the barrel so that it would go over and kind of wedge onto the top of the barrel. The head of a barrel is inset so we had some challenges getting the laser to go down far enough to be in the focal range (it would have been below the bottom surface of the laser gantry.)
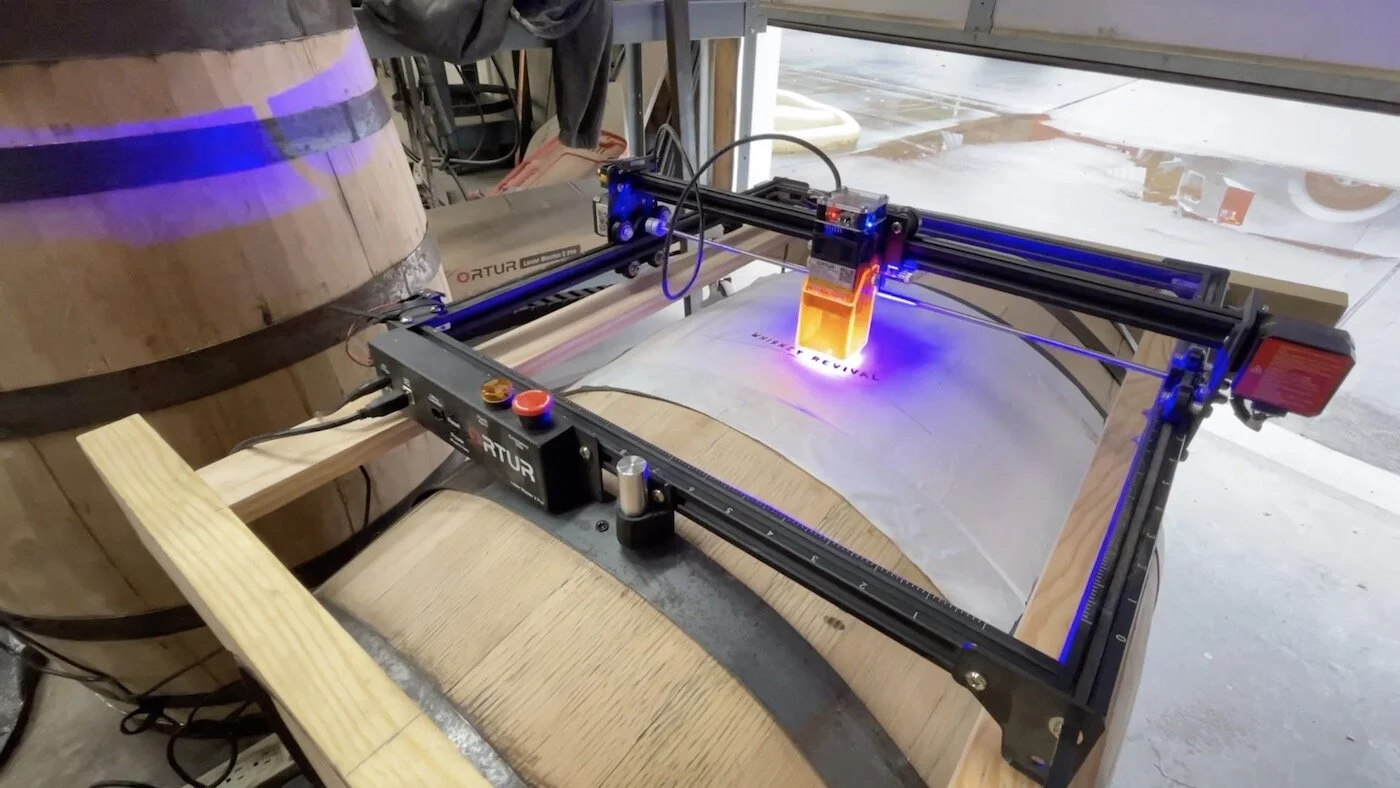
The other jig would be more of a cradle that would sit over the belly of the barrel, but a cutout section in the middle. This would allow the laser to sit level/flat on top of the round barrel. We secured the jig to the barrel using some bungee cords.


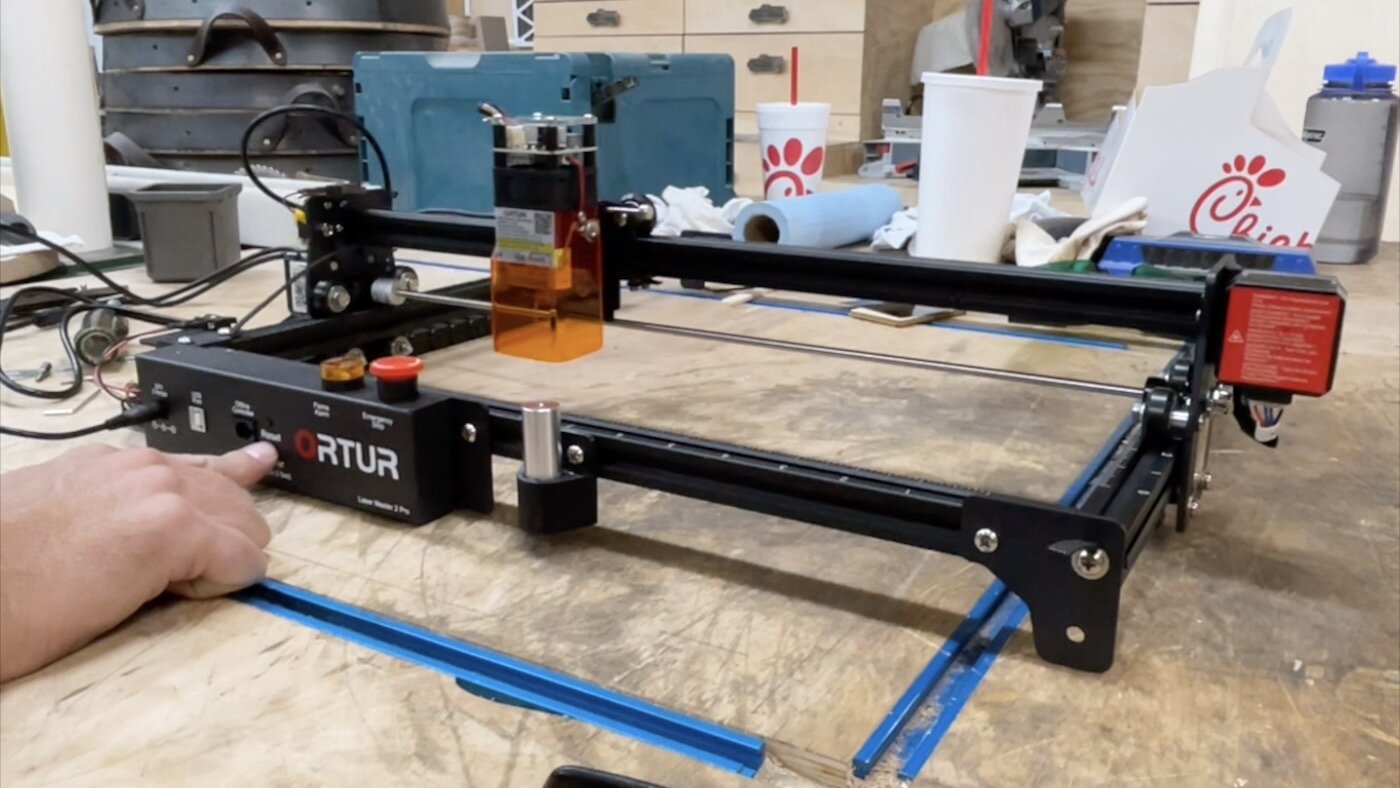
UNBOXING & ASSEMBLY
The laser engraver came in a surprisingly small box. It shocked me just how compact it was. Because of that, the unboxing was about a 5 minute ordeal.
Assembling everything took me about 25 minutes or so, just because I wanted to make sure I didn’t mess anything up. There are some instructions included with the laser, but they’re not great. I followed the assembly instructions from this video on YouTube & it was excellent!


USING THE LASER
There are some different software options you can use with the laser engraver. I happened to use LightBurn since my friend already had a copy of it and was familiar with it. There are a few things you have to kind of walk through to make sure the settings are correct, but overall, it was pretty simple. I’m not going to go into full detail about settings and that kind of thing in this article.
Once you plug in the laser, you need to twist the “No-No Button” and lift until it pops up. While it is depressed, the laser will not run. This is the emergency stop button and it is the cutest little button I’ve ever seen. ha.
Then, you hold down the reset button for about 4 seconds and you’ll see the laser move to the 0,0 position in the lower left. It will go over and down until it hits the limit switches in each direction, indicating to the laser that it is home.

THE FIRST ENGRAVE
After getting the machine all setup, it was time to do the first test engrave. We just used a piece of 1/4” plywood with some masking on it for the test and grabbed an image we had ready to go. It turned out really good and we found out we can make the laser move a lot faster than we originally thought we could. In this example, we stopped it halfway through and then started it over, so that’s why the bottom of the engrave is darker than the top.


ENGRAVING A BARREL HEAD
Engraving a barrel head when it is not in the barrel is not too difficult, since it can sit flat and you can have pretty good access to it. Engraving a barrel head while it is still in the barrel becomes a much more difficult task.
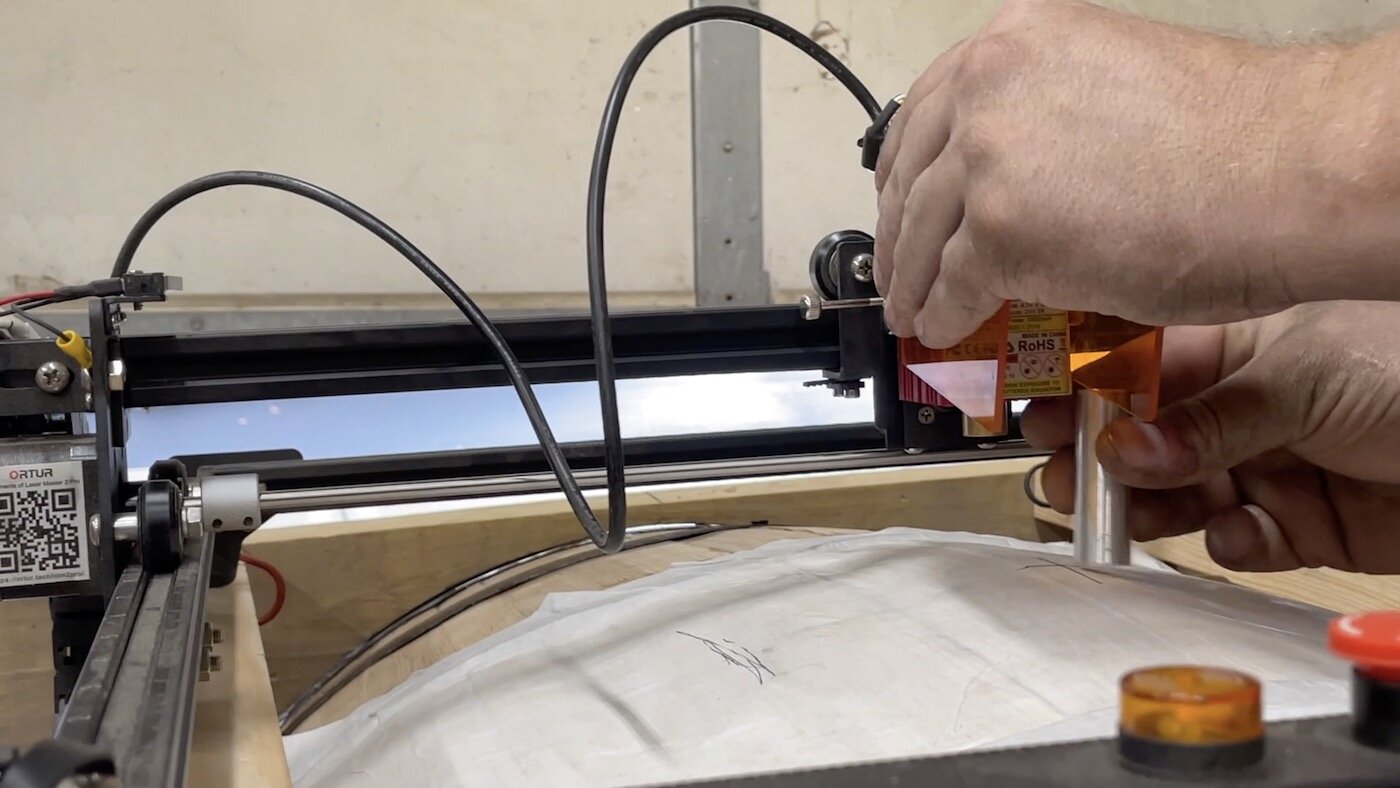
Probably the trickiest part was getting the barrel head into engravable range. There is only a certain range that the head of the laser can move and accommodate different focus heights. We ended up (as you read earlier) making a jig out of a piece of plywood so the laser could sit outside of the barrel just a bit and kind of float down so it would reach the head of the barrel.


ENGRAVING THE BELLY OF A BOURBON BARREL
On to the final event…engraving the round belly of a bourbon barrel. This is one of the main tests I wanted to do with this laser, to see just how well it would handle a curved surface.
You’ve already seen how the cradle works, so now it’s time to see the belly engrave in process.
NOTE: We had a fan blowing across the laser and outside just to evacuate the fumes. I would recommend this. Also, there is a flare up sensor or something that we could not figure out how to turn off. There is probably a way and I recommend it, so long as you’ll be right there with the laser while it is engraving. The sensor ended up being WAY too sensitive and dust and even sunlight would even set it off, interrupting the engrave.
We got the settings down to where it would only take about 25 min to do the engrave that you’ll see here at the end.

To set the focus height of the laser, you need to unscrew and flip up the orange guard. Then, you use the silver piece of aluminum and reference that off of your work piece. You rest the laser head on it and that will give you a clean, focused engrave. We had to cheat this just a little bit since it was a rounded surface. We could not set it for the deepest part nor the shallowest…we kind of had to split the difference.


IS A CHEAP LASER WORTH IT?
You’ll have to answer that question for yourself and a lot of that will be determined by what you’ll be doing with it. At the time of this writing, this laser costs about $450, so it is very affordable.
For many things, and home projects, this laser will be more than capable for what you’re wanting to do. If you’ll be doing production work for things to sell, it might still handle that, but you might be lacking on the speed of it. Again, it depends on what you’re engraving. If it is something small, this one very well could work for you.
Thanks for checking out this project! If you haven’t already, give the video a watch and let me know what you think. And if you are in the market for a laser or even just shopping for anything on Amazon, use one of my affiliate links above. It helps me out and costs you nothing!